Project "Fiat V-Spec" (page 6) |
||||||||||
FV-S Page 1 /
FV-S Page 2 / FV-S Page 3 /
FV-S Page 4
/ FV-S Page
5 / |
||||||||||
|
Ever
closer....until... |
||||||||||
|
- - - 12/10/03 - - - The latest: I have new NISMO 555cc injectors now - the other ones turned out to be 370cc units! I have now installed these injectors in addition to the new timing belt and water pump onto the replacement motor. The oil pan has a dent that I need to fix, so the oil pan is now off the car - the removal of the pan was a nightmare, as to get the pan off I had to remove a brace that went from the engine to the bellhousing..but to get THAT off I had to remove the oil filter relocation piece...and to get THAT off I had to unbolt a turbo! In the meantime I've also prettied up the engine by painting a few pieces. Once the oil pan is fixed reassembly/reinstallation is all that's left! Pictures to follow.. In addition to this I am having the airdam modified. It it getting a "splitter", basically a piece that is on the bottom of the airdam and runs parallel to the ground but sticks out 1-3" in front of the bottom of the airdam and keeps air from spilling underneath the car and directs it up into the engine bay or the sides of the car, this should help with cooling. - - - 12/13/03 - - - I
fixed the oil pan, and now it is back on, as well as the oil filter
relocator and the turbo - so now I need to double-check everything and
possibly re-route some heater tubes/hoses, then install the flywheel,
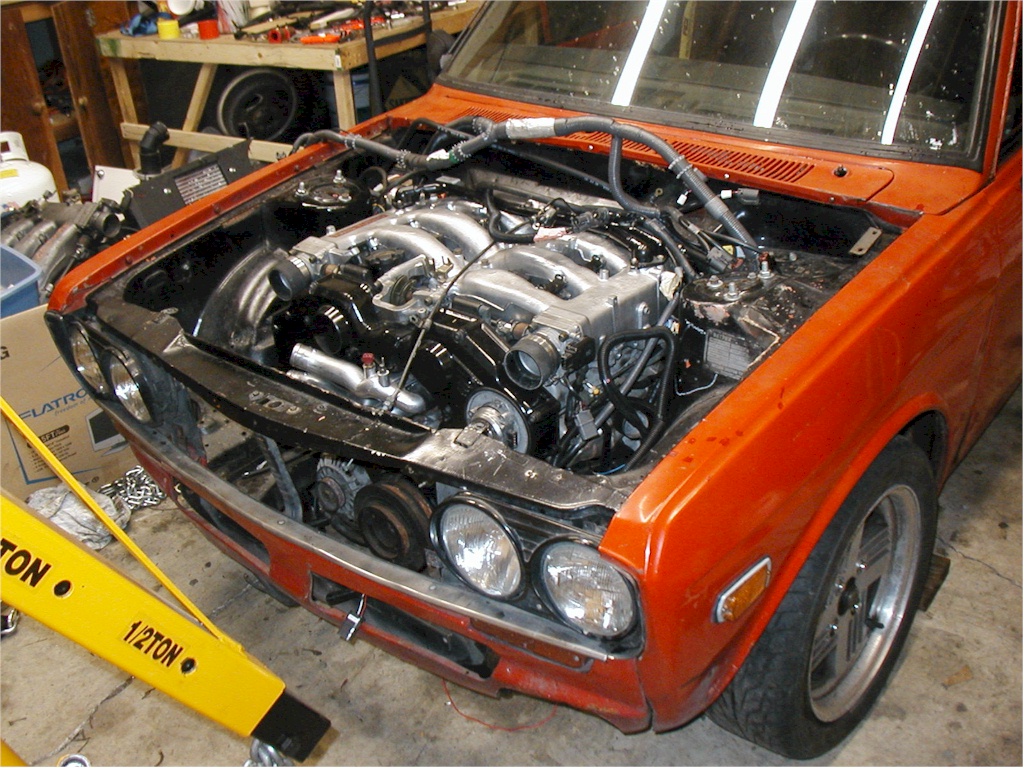
clutch, attach the transmission and drop the engine into the car. See the
latest picture below
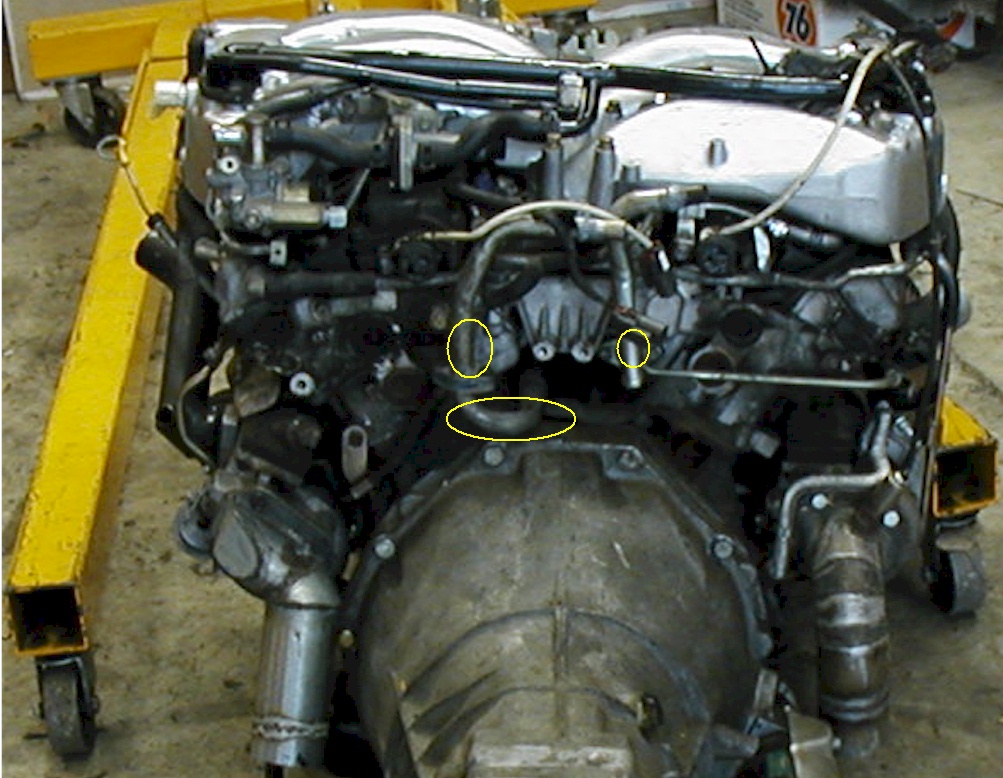
- - - 12/18/03 - - - Only a little work done tonight, although it is off the engine stand for the first time in many months! Part of my dilemma was where to lift the engine from. Previously I used straps and ran them under the intake runners, but as the plenum won't be completely bolted on until the engine is in the car and the injector wiring is hooked up (the only way to plug them in requires the intake manifold to be partially unbolted. I replaced a couple of hoses and attached found I had only attached one motor mount, so now that's on. I forgot I had let a friend of mine use my flywheel bolts for his VG30DE 510 so I did not get the flywheel & clutch bolted on tonight. - - - 12/28/03 - - - The flywheel and clutch are now bolted on. While checking over the engine I found the psgr side turbo didn't have the wastegate hooked up - I had unhooked it to get to some other bolts and hadn't reconnected it. No boost control for one turbo would have been a mess. - - - 1/15/04 - - - A few days ago I attached the engine to the transmission. Two days ago I spent a marathon day (17 hours), looked everything over, and with the help of some friends we got the engine dropped back into the car on its motor mounts! Then we discovered two problems: 1) I had modified the heater tubes to go from 3/4" OD to 5/16" OD so I could run normal heater hoses to the 510 heater core w/out using plastic adapters at the rear of the engine (like I had done wit the non-turbo VG30DE) which is rather cramped. This modification added just enough length and angle to the tubes that they were now pressed against the firewall. 2) I had overlooked the remote shifter as we were installing the motor and it was below the transmission mounting tabs instead of above it. Of the 17 hour day, the last 3 hours was me pulling the engine completely back out of the car and it made a depressing finish to what 4 hours previously looked like a great success. Yesterday I spent a few hours modifying the heater tubes so they will clear the firewall and I discovered somewhere during the install or removal one of the wires to one of the variable valve timing controls (NVCS) was cut - hopefully I can get this repaired (there's only 1/8" of one of the wire coming out of the solenoid), if not it will be a very BIG setback if I have to replace the controller as the intake plenum, and valve cover would have to come off and God only knows how much the part costs. In any case there's a lip on the firewall that I know these wires got cut on so I removed a couple inches and flattened out several more of this lip. The only good thing that came out of these last work sessions is we're getting faster at R&R of this engine. - - - 1/19/04 - - - Yesterday I had a friend repair the NVCS wiring, so I'm back in business there. I also re-routed the heater hard lines so the last known fitment issue should no longer be an issue! I ended up cutting both height and depth on the tubes. This actually created a couple of smaller issues as the coolant return from the turbos both pipe back into these heater hard lines, so I now cannot use the factory Nissan hoses since the lengths and paths are different, but standard hoses works here just fine with no bending. See below for areas I changed the hard line routing - these are thumbnails and the first picture, when in full view has areas circled where I made changes. Non-circled modifications to the tubes is where I made a change to go from 3/4" (Z-car size to heater core) to 5/8" (510 heater core). Also note on the left tube the flange above the little curve I took out also changed 90 deg, so I had to re-route the upper tube to compensate for that as well. Amazing how one change turns into six and seve little "corrections".
I'm hoping to drop the engine/trans back in the car tomorrow! - - - 1/23/04 - - - Ok so I had to wait a few days, but tonight a friend (Sean Funk, who has unselfishly helped me so much with this project lately - thanks Sean!) and I managed to get the engine dropped in the car and on its motor mounts on only 2.5 short hours! (yes the normal 4cyl can be removed AND reinstalled in that time). We got the engine in with amazingly few issues - amazing what "practice" does! Some keys for getting the engine in (in case I have to refer to this later and forget all our little "tricks"). 1) Remove the starter so it doesn't hit the firewall on the way in. The engine needs to tilt or "list" toward the drivers' side so the oil pan bulge clears the steering arm, and the starter and exhaust downpipe fight for space if left installed. NOTE- reinstalling the starter is easist done by removing the psgr front wheel and using a short 14mm wrench (I cut my wrench down to make it short just for this). 2) In addition to the engine leveler, use a come-a-long so you can no only tilt the engine for/aft, but also to create the proper left/right tilt. 3) Ron was able to get around this, be we needed to unbolt the front crossmember to get the last 1/4" clearance for the oil pan, and yes, we did jack the rear of the car as far as possible to get more angle while working. The heater tube modifications came out great (at least fitment, hopefully they won't leak), and we remembered to keep the remote shifter in mind. In addition to getting the engine on its motor mounts, I installed the transmission crossmember, shift linkage, drive shaft, tightened the starter and reattached the front crossmember - basically everything aft of the bell housing is hooked up. Tonight is the first time in many months the car is off jack stand with the engine/trans in the car!
Now I get to figure out all the plumbing and wiring. With any luck I can have most of it figured out by the time the weekend is over. - - - ** 1/25/04 ** - - - I was spared a lot of work -
Ron came over on the 24th and did the wiring for me! I then plumbed the
heater, installed the mechanical fan and radiator, and the intercoolers. At
1:00pm I turned the engine over until it just started to try and run (maybe
10-15 seconds). I was convinced it was long enough to build oil pressure so
I went through and double-checked everything because I knew there were a few
things needed before I ran it any amount of time. I also changed the oil
filter as the one one the engine was dinged during the install. I push the
car into the driveway and look everything over: At about 4:00pm PST I cranked the engine over - VROOM! It works! Sounds kinda rough though. I shut it off, make a phone call...."change the plugs before doing anything else". In the excitement I hadn't replaced the plugs that came with the engine! New plugs - check! Fire it up again and it sounds SO MUCH BETTER! I let it run....shortly it starts smoking from the passenger side, looks like steam - crap! I shut it off, and make some more phone calls to my more experienced car buddies, and a couple other friends come over (we had just happened to invite them over for dinner this day). Fire it up again, and let it run until coolant gets up to temp. Oil pressure is good (~20psi @ idle), vacuum looks good (17in at idle). It's not steam, it's light-colored smoke, and the smell of really old fuel being burnt - I forgot the fuel in the car was over a year old! I drive the car into the garage at idle (at least this engine can move the car, remember the first TT couldn't, even with lots of throttle) We stop the engine and pull the plugs. 5 of the plugs look a little sooty, but dry. The plug for #5 cylinder (same side that smokes) is clean and wet with fuel - it's not firing. We change coils with #1 (each plug has its own ignition coil) to see if that makes a difference. Fire the car back up....no change. As we're letting the car idle it dies...out of fuel! We're going to see if one of the PCV valves is the culprit for the smoke and also diagnose the cause of the miss. However, the car is completely assembled and we're down to some troubleshooting! |